Thursday, 1 June 2017

MIKROTIK:-About PPPoE

we all know that , The PPPoE connection is the very popular in ISP industry and now a days all the ISP's are using this service to provide the broadband connection .

Point To Point Protocol over Ethernet (PPPoE)

The working standard for the PPPoE protocol was published by the IETF in 1999. The IETF specification for PPPoE is RFC 2516. PPPoE expands the original capability of PPP by allowing a virtual point to point connection over a multipoint Ethernet network architecture. PPPoE is a protocol that is widely used by ISPs to provision digital subscriber line (DSL) high speed Internet services, of which the most popular service is ADSL. The similarity between PPPoE and PPP has led to the widespread adoption of PPPoE as the preferred protocol for implementing high speed Internet access. Service providers can use the same authentication server for both PPP and PPPoE sessions, resulting in a cost savings. PPPoE uses standard methods of encryption, authentication, and compression specified by PPP.
PPPoE is configured as a point to point connection between two Ethernet ports. As a tunneling protocol, PPPoE is used as an effective foundation for the transport of IP packets at the network layer. IP is overlaid over a PPP connection and uses PPP as a virtual dial up connection between points on the network. From the user's perspective, a PPPoE session is initiated by using connection software on the client machine or router. PPPoE session initiation involves the identification of the Media Access Control (MAC) address of the remote device. This process, also known as PPPoE discovery, involves the following steps:
  1. Initiation - The client software sends a PPPoE Active Discovery Initiation (PADI) packet to the server to intitiate the session.
  2. Offer - The server responds with a PPPoE Active Discovery Offer (PADO) packet.
  3. Request - Upon receipt of the PADO packet, the client responds by sending a PPPoE Active Discovery Request (PADR) packet to the server.
  4. Confirmation - Upon receipt of the PADR packet, the server responds by generating a unique ID for the PPP session and sends it in a PPPoE Active Discovery Session (PADS) confirmation packet to the client.
When a PPPoE session is initiated, the destination IP address is only used when the session is active. The IP address is released after the session is closed, allowing for efficient re-use of IP addresses.


Some Important Points about PPPoE network .


MIKROTIK:-SNMP Configuration


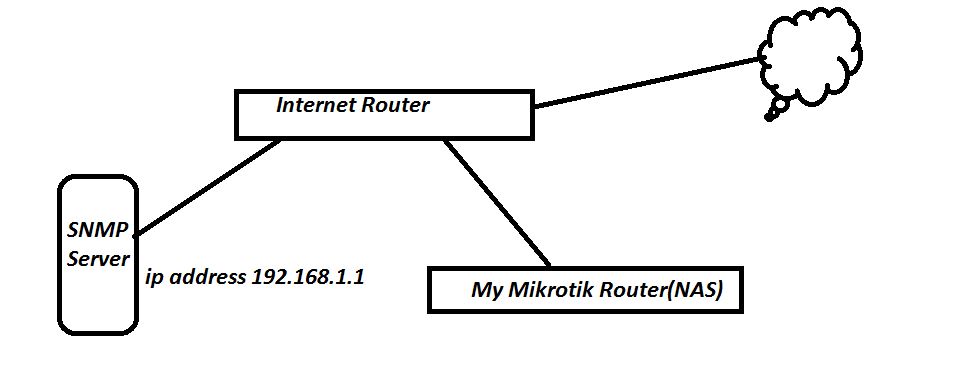
This is one of the  very Important to monitor the interface bandwidth through the SNMP software's . Here , I am using the PRTG software to monitor my network and My network diagram is given below.

I have the reach-ability to my SNMP server from My mikrotik NAS , So before you configure the SNMP you have to provide the reach-ability  from your device to SNMP server .

Let's configure the SNMP in Mikrotik Router .


Based On your requirement you can make it change . Please go through my below pic and this picture i have taken from mikrotik official website .


Here , I am not showing you How to configure the PRTG software .But later on I will discuss it in one separate section so after configuring the above things you will be able to get the SNMP logs in the SNMP server .

MIKROTIK:-OS Version Upgradation

There are many ways to upgrade the OS in Mikrotik device. Here , I will discuss all types of
ways to upgrade the version .

1-You Can check the update inside the system in mikrotik.(Router should be connected to the internet)
2-You can  upgrade the OS after download the latest patches from Mikrotik official website
then you have to keep that downloaded file in the File directory of mikrotik (drag and drop).Then after you have to reboot that mikrotik .
3-Through the TFTP server you can upgrade it .


Lets start .'


 Go To System>Packages


Step -2

Click On Check for Updates.
Note:-Before you click on Check For Updates , you have to add the dns IP in mikrotik otherwise your mikrotik cant be find that latest OS from mikrotik server.


See Here , After clicking on the check for updates it's showing me there is now available new version of mikrotik which is 6.39.1 and the installed version is 6.38.5. So once I will click on Download and Install then the up-gradation will be started .


Step-4
Click on Download&Install

Once you click on the Download&Install  it will download that patch from mikrotik server and the router will be rebooted automatically after completion of downloading .


Another way to upgrade the version of Router OS .


Click on the below Link to download the latest Patch file from mikrotik official website .

https://mikrotik.com/download


After clicking on the above link you will be ridirected into the mirkotik official website and based on your hardware you have to choose the Router Os . In my case I have the CCR 1009 so
I am going to download the CCR Os from this website .


You can see my on my above picture , As I have mentioned I have CCR 1009 so I have to
download the CCR Current Version (6.39.1(Current))


After downloading this file from this link then you have to keep that file in the mikrotik File directory .

Here, After downloading the file i kept that file in  my desktop and I took that file in to mikrotik File directory (Just Drag and drop)


After uploading that file into Files of mikrotik , You can see that OS in the File directory.


Now just reboot the router and after rebooting the mikrotik device you can see the version up-gradation has been successfully .

MIKROTIK:-VLAN in MIKROTIK

As we know the VLAN is a virtual interface we can create multiple virtual interface under the one
physical interface.

Lets start the configuration first .

Let me show you my diagram to connect the switches and one of my Cisco 2960 switches ..


Step-1


Create the VLAN in Mikrotik .

Click on Interface>VLAN>Add


Note: MTU should be set to 1500 bytes same as on Ethernet interfaces. But this may not work with some Ethernet cards that do not support receiving/transmitting of full size Ethernet packets with VLAN header added (1500 bytes data + 4 bytes VLAN header + 14 bytes Ethernet header). In this situation MTU 1496 can be used, but note that this will cause packet fragmentation if larger packets have to be sent over interface. At the same time remember that MTU 1496 may cause problems if path MTU discovery is not working properly between source and destination.


There is no need to select the service tag because it can happen automatically based on the device intelligence .


Step-2
Create the VLAN in Cisco switch
--------------------------------------------

switch(config)#vlan 2 name laxmi


Configure the TRUNK Port

 switch# configure terminal
switch(config)# interface ethernet 0/1
switch(config-if)# switchport mode trunk
switch(config-if)# switchport trunk allowed vlan all
switch(config-if)# exit


Step-3

Configure the access port in switch .

switch# configure terminal
switch(config)# interface ethernet 0/2
switch(config-if)# switchport mode access
switch(config-if)# switchport access vlan 2
switch(config-if)# exit


 you can configure the IP address in the vlan 2 of mikrotik and you will provide the another IP
to the PC from that same subnet .


MIKROTIK:-IP Settings

There is very important things which you need to remember before you use the mikrotik device
as a router . As we know that Router is the layer 3 device and which is forward the traffic based on the source IP and Destination IP but here you have to have a click on "IP Forwarding ".


As we know initially we need to enable " IP routing" in Layers 3 switches so Same here you need to look on that. By default it's enable and if you want to make practice then you can enable and disable this features.

Example given Below.


MIKROTIK:-IP neighbour Lists.

This features is same as  CDP of Cisco platform .The neighbour lists says that which ever the devices is connected from this Mikrotik directly you can see all the details of those Mikrotik or any vendors device .


Example below given .


MIKROTIK:-IP Services in Mikrotik

These are the services  very important to understand because it's very important to enable and disable the services based on your requirement .

Application Programmable Interface (API) allows users to create custom software solutions to communicate with RouterOS to gather information, adjust configuration and manage router. API closely follows syntax from command line interface (CLI). It can be used to create translated or custom configuration tools to aid ease of use running and managing routers with RouterOS.

To use API RouterOS version 3.x or newer is required.

By default API uses port #8728 and service is disabled. More on service management see in corresponding manual section. Corresponding service name is api.


Lets you are using the Mikrotik NAS with any others vendor RADIUS, in that case it very important to enable the API services .because there is very important to have a communication  between NAS and Radsius .

Note:Make sure that "Don't disable the winbox services ,if you will disable it then you will not able to access the router through the interface  "And also you can disable the WWW for preventing the web access of Mikrotik .