Monday, 5 June 2017

MIKROTIK:-Types Of Login in HOTSPOT

The HOTSPOT services provide us the different type of authentication mechanism to access the services , It means there are lots of customisation you can do based on your requirement .

1-HTTP Login .


HTTP login is the process which allows to the user to open up the login page in the browser and will have to login with giving the username and password which you have created in your RADIUS.

Lets you don't have any radius server in your network and you are using the mikrotik it self as NAS
and RADIUS in that case you have to create the username and password .


The IP address which you provide to the user that may be through DHCP and that may be Static but the the cases the user's login page URL address will be the gateway address of the user IP.

And Like wise you will bind the users client login page URL with one domain that would be easiest way to access the login page easily .


2-MAC Base login .

The MAC base login is the advance features in Mikrotik and there is no need to open the login page for users because you have to bind the IP address with users MAC . and once that users will be connected in your mikrotik with the given IP address and same MAC which you bind against that IP address in that case the user will be logged in automatically through the MAC .


Now a days all the RADIUS companies have integrated that features in their RADIUS to support these features .


3-Cookies Based Login .

Once teh user is successfully login, A cookie is sent to the web browser and the same cookie is added to active HTTP cookie list. Next time the same user will try to log in, web browser will send the saved HTTP cookie. This cookie will be compared with the one stored on the HotSpot gateway and only if source MAC address and randomly generated ID matches the ones stored on the gateway, user will be automatically logged in using the login information (username and password pair) was used when the cookie was first generated. Otherwise, the user will be prompted to log in, and in the case authentication is successful, old cookie will be removed from the local HotSpot active cookie list and the new one with different random ID and expiration time will be added to the list and sent to the web browser. It is also possible to erase cookie on user manual logoff (not in the default server pages, but you can modify them to perform this). This method may only be used together with HTTP PAP, HTTP CHAP or HTTPS methods as there would be nothing to generate cookies in the first place otherwise.


Saturday, 3 June 2017

MIKROTIK:-Hotspot Configuration On Bridge Interface

There is an another features of mikrotik to run the Hotspot on bridge interface . As I discussed on my previous chapters  Bridge is just a combination of multiple port and this interface will be act a single port internally .


if you want to run multiple HOTSPOT server instance on each interfaces that would be a like overhead on the router so if you want to use multiple LAN port on specific services then that would be better to configure the bridge interface using multiple ports and then after you can run the Hotspot on that bridge interface.

Network Diagram Given Below .


Here , I am not going on the step by step to configure because the configuration is same as normal configuration but only you have to create the bridge interface before you run HOTspot on bridge Interface .


Create one Bridge and assign the ETh-1,2,3 inside that bridge .Here I am going to show you all the things in single picture.

Create a bridge (In my case i have kept the name as laxmi)

Create a hotspot sever on that bridge interface .


In my above Picture I have removed the physical interface from interface list and I have assigned the bridge interface which is named as laxmi.


NOTE:- Some key points .


MTU value Should be same in all interfaces .
Speed and Duplex Should be same in all interfaces .


You don't need to change anything at any where except these changes what I Did on my above picture .


MIKROTIK:-Hotspot Configuration On VLAN

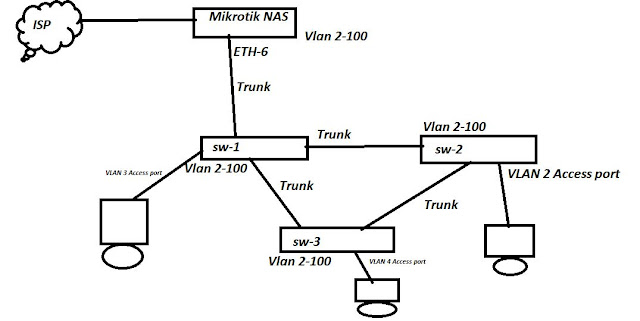
This is one of the most popular method  in ISP domain because most of the ISP's are using the VLAN in their network  . But there is some additional configuration required for this activity .We can configure the multiple Hotspot server in one physical interface using multiple VLAN and as you can see my picture below there is configured the LINK from mikrotik NAS to switch is trunk link and also I have allowed all the VLAN in that port .


Lets start the configuration .


Lets Start the configuration according to my scenario .


Configure the VLAN first in  Mikrotik .


Here , I have created  only 3 vlan for testing purpose but you can create up to 4096 VLAn in the Mikrotik .

Step-1

Click on Interface >VLAN>Add vlan(+)

/interface vlan
add interface=ether6 name=vlan2 vlan-id=2
add interface=ether6 name=vlan3 vlan-id=3

add interface=ether6 name=vlan4 vlan-id=4

Step-2

Configure The IP address in each VLAN.
Step-3 

Create the HOtspot server on VLAN interface .

I Have created 3 HOTspot servers for VLAN-2,3,4 . and in same way you you can create multiple HOtspot server under one physical interface using VLANs .


Apart from that , No need to change anything in the configuration end . everything would be same as my previous hotspot server configuration .


After completion of these things in the Mikrotik then  you have to create the VLAN(2-4) in cisco switch and the port should be configure the trunk between the switches .And you need to make the access port for providing the access to users .


You don't need to change anything at any where except these changes what I Did on my above picture .


Please find the below commands.

/interface vlan
add interface=ether6 name=VLAN2 vlan-id=2
add interface=ether6 name=VLAN3 vlan-id=3
add interface=ether6 name=VLAN4 vlan-id=4

/ip hotspot profile
set [ find default=yes ] login-by=http-chap,http-pap use-radius=yes
add hotspot-address=192.16.1.1 login-by=http-chap,http-pap name=hsprof1 \
    use-radius=yes

/ip pool

add name=VLAN2 ranges=11.0.0.2-11.0.0.254
add name=VLAN3 ranges=12.0.0.2-12.0.0.254
add name=VLAN4 ranges=13.0.0.2-13.0.0.254

/ip hotspot

add address-pool=VLAN2 disabled=no idle-timeout=none interface=VLAN2 name=\
    server1
add address-pool=VLAN3 disabled=no idle-timeout=none interface=VLAN3 name=\
    server2
add address-pool=VLAN4 disabled=no idle-timeout=none interface=VLAN4 name=\
    server3

/radius
add address=10.0.0.100 secret=secret service=ppp,hotspot timeout=9s

/radius incoming
set accept=yes

/ip address
add address=192.168.2.1/24 interface=VLAN2 network=192.168.2.0
add address=192.168.3.1/24 interface=VLAN3 network=192.168.3.0
add address=192.168.4.1/24 interface=VLAN4 network=192.168.4.0

/ip dns
set cache-size=10000KiB servers=8.8.4.4,8.8.8.8 


MIKROTIK:-How to add Secondary IP in Mikroitk interface .

As you can see in my below pictures , i have configured 4 IP address from 4 subnets under one physical interface .


Please follow the below commands and also you can add the multiple IP in GUI as well .


/ip address
add address=192.16.1.1/24 interface=ether6 network=192.16.1.0
add address=192.168.2.1/24 interface=ether6 network=192.168.2.0
add address=192.168.3.1/24 interface=ether6 network=192.168.3.0
add address=192.168.4.1/24 interface=ether6 network=192.168.4.0

MIKROTIK:-Hotspot Configuration.

Based on your network diagram you have to create the hotspot server because that is more important to understand the network topology and implementation.

Here , I am using the DMA Radius with my mikrotik NAS and my Radius is existed in the cloud .
That doest not matter whatever the radius server you are using because the hotspot configurations will be remain same in mikrotik nas and only the Authentication port and Accounting port can be different for different vendors of RADIUS .


Please find the diagram below of my network .


Lets get in to the hotspot configuration .

NOTE:-Sometimes the Hotspot is disabled in the mikrotik router so if it's disabled then  you have to make it enable .and follow the below process to enable the hotspot .


As you can see on my above picture , My hotspot is disabled so let me make it enable first .

Once you will click on Enable , The mikrotik will be make the  schedule to enable the hotspot in next reboot .


Now after click on the Enable button I have rebooted the router and my  hotspot is enabled now .


Lets start the hotspot server configuration according to my network diagram.

As  you can in my network diagram , my LAN interface is ETH-6 and I am going to use that eth-6
interface as HOTspot interface because all of my lan users are connected from this port .So once the user will be trying to browse the internet initially after giving the IP address in his/her computer the user will be automatically redirected into the Hotspot login lage .because without login that user will not be able to access the internet .


According to my scenario the users gateway interface is my ETH-6 of mikrotik NAS and I have configured a /24 ip subnet in this interface .

Configure the IP address of your hotspot interface .


Go To IP>Address>Add IP address (+)


Step-1

Create the Hotspot on 6 number interface of mikrotik.


GO To IP>Hotspot>Hotspot Setup>Select the interface 

Please go through the below images to complete the configuration .

Once you will select the interface the router will take the ip pool in that hotspot interface automaticall and will add that subnet range itself  in IP POOL .

 Dont need to select any certificate , If you have purchaged the SSL certificate then you can give the certificate .And Choose SSL certificate, when HTTPS authorization method is required.
 IP address of the SMTP server, where to redirect HotSpot's network SMTP requests (25 TCP port)
 DNS is mandatory to provide .
 NO need to add any DNS name .
username of one automatically created HotSpot user.Password for automatically created HotSpot user
 Click on OK.
Now the HOTspot server configuration is completed .

NOTE:- When you are creating a Hotspot server in mikroitk in that case the router itself is creating  a DHCp Server  automatically in that hotspot interface and when any user will be connect from that hotspot interface he/she will get the IP address automatically through DHCP server .


If want to use the dhcp server for hotspot network then you dont need to disable and if you dont want to use the  DHCP server for LAN users then you have to remove the DHCP server from Mikroitk .


Lets Verify the DHCP server after finishing the configuration of HOTSPOT server .

As you can see on my below picture there is created one DHCP server in eth-6 . SO i am going to remove that DHCP server from that interface because i dont need the DHCP in my LAN
.

I am going to remove the DHCP server .

It's removed NOW .

And also after creating a hotspot server the mikrotik router is creating a IP pool automatically in the IP pool List .


And also once you create a HOt server the mikrotik will be create one Hotspot profile automatically .
you can see on below picture the profile name is hsprof 1

 Go to Profiles>Double click on that profile to see the details .
This is very important to configure the Hotspot profile for Hotspot server beacuse based on your profile
the services will be available to the users .
 Hotspot Address- This is your hot interface IP .

 The Login process should be selected same as your Radius compatible process .
Select the Use radius and Accounting .

RADius configuration for hotspot in mikrotik NAS.


Address:My Radius IP
Secreat:-Shared secret used to access the RADIUS server.
Authentication Port -RADIUS server port used for authentication
Accounting Port:-RADIUS server port used for accounting.


Note:-Don't Select the Accounting Backup always if it's not  for backup RADIUS server.


You have to select the Radius Incoming because that allow to terminate a session which has already been connected from RADIUS server. For this purpose DM (Disconnect-Messages) are used. Disconnect messages cause a user session to be terminated immediately.

And also you have configure the NAT for Private ip (192.168.1.0/24).

After completion of this process in mirkotik NAS you have to add this NAS in your radius .Here, i am not showing you that . you can add that in your RADIUS .


Please find the below Commands to configure the task .


/ip hotspot profile
add hotspot-address=192.16.1.1 login-by=http-chap,http-pap name=hsprof1 \
    use-radius=yes

/ip pool
add name=hs-pool-10 ranges=192.16.1.2-192.16.1.254

/ip hotspot
add address-pool=hs-pool-10 disabled=no interface=ether6 name=hotspot1 \
    profile=hsprof1


/ip address
add address=192.16.1.1/24 interface=ether6 network=192.16.1.0

/ip dns
set cache-size=10000KiB servers=8.8.4.4,8.8.8.8

/ip firewall nat
add action=masquerade chain=srcnat comment="masquerade hotspot network" \
    src-address=192.16.1.0/24


/radius
add address=14.0.0.1 secret=secret service=ppp,hotspot timeout=9s

/radius incoming
set accept=yes

Friday, 2 June 2017

MIKROTIK:-Hotspot All About.

This is one of the well known features in Mikrotik . As we know that there are many techniques which is being used by the broadband service provider to provide the broadband internet connection and hotspot is one of the popular services in Broadband ISP domain .


What can you do with with hotspot .

1-different authentication methods of clients using local client database on the router, or remote RADIUS server;
2-users accounting in local database on the router, or on remote RADIUS server;
3-walled-garden system, access to some web pages without authorization;
4-login page modification, where you can put information about the company;
5-automatic and transparent change any IP address of a client to a valid address;


Note:-The hotspot  is designed to manage HotSpot servers of the router. It is possible to run HotSpot on Ethernet, wireless, VLAN and bridge interfaces. One HotSpot server is allowed per interface. When HotSpot is configured on bridge interface, set HotSpot interface as bridge interface not as bridge port, do not add public interfaces to bridge ports. 


There is  One big advantage of using hotspot is that HotSpot does not require any client software/driver/dialer. One disadvantage of using HotSpot is that its usually requires your client to open up his browser to log in before he can use your service . So users wanting to connect to your service using a router or some kind usually have a problem (as routers usually don’t support logging in via HTTP).


MIKROTIK:-PPPoE connecting over VPN(PPTP)

It's one of the interesting thing i am going to discuss on .


I want to log in as PPPoE VPN user in my mikrotik nas , Which is exist on the internet .and I am at remote location but i want to login as a PPPoE user over the VPN.


Lets start the configuration .


Before you want to log in as PPPoE VPN user  you must have to provide the reach-ability to your mikrotik NAS . But here my PC  is connected to the internet through Relianc JIO and My nas is existed in remote Location . Because my NAS is in Public IP .


Lets start the configuration .


Here , I have existing PPPoE server  setup where my all users are connected from LAN and Now
i am going to connect my PC as PPPoE user over the VPN .

Step-1

Go to IP>Pool>Create Pool>


In my case, I am going to create the 12.0.0.0/24 as a VPN ip pool .


Go To >PPP>Profile>ADD Profile(+)

you have to create a different PPPoE profile for VPN because you may have existing PPPoE Profile  which is running on existing setup .So that would be better to create a different PPPoE
profile to not interfering with existing profile .


 As you can see on my above picture , I have created a new profile the name of VPN Profile.

Local Address -The WAn IP of my NAS.
Remote IP -My IP pool which is created the name of 12.0.0.0/24(VLAN3).

Step-2

Create a PPTP interface in mikrotik NAS.

GO to>PPP>Interface>PPTP Server Binding 


Just add a PPTP server Binding and give any name whatever you want .In mycase i have given the name as pptp-in-Laxmi


Step-3

Enable the PPTP service .

Go To PPTP Server>Click on Enable and as you can see below on my yellow highlighted area of the image . 


Step-4

Create the username and password which you are going to access over the VPN and PPPoE users .


Go to PPP>Secret>

 Local Address- This is my NAS's WAN IP  .


Remote IP -  when any VPN user will try to login
over the as PPPoE using this username (laxmi) and password he/she will get this IP address(12.0.0.20).

Profile-I have selected VPN Profile which I have created for VPN users .

Service-Service name should be selected as a PPTP.

Step-5

Configure the nat for 12.0.0.0/24 network .


Step-6 


Create the VPN Connection in windows machine , here I have windows 10 and i am going to create the VPn connection in this machine ..

Go to following 

Control Panel>Network Adaptor setting >


Once you will click on Connect to a workplace you will be able to enter the username and password . and you have to give same username and password which you have created in mikrotik PPP>secret, In my case my username is laxmi and password is 54321.


Now you can see in the system the VPN connection is established and the ip address is 12.0.0.20.


Step 6-

To verify the user in nAS 


Now you can see teh user is live in NAS as L and service is PPTP.


You can follow the below commands to configure this above tasks in NAS.


/interface pptp-server server
set authentication=pap,chap,mschap1,mschap2 default-profile=profile1 enabled=\
    yes

/ip firewall nat
add action=masquerade chain=srcnat src-address=12.0.0.0/24

/ppp secret
add local-address=WAN IP(you can Give) name=laxmi password=12345 profile=\
    "VPN Profile" remote-address=12.0.0.20 service=pptp

/ppp profile
add dns-server=8.8.8.8,4.2.2.2 local-address=(WAN IP address ) name="VPN Profile" \

    remote-address=VLAN3