Friday, 2 June 2017

MIKROTIK:-PPPoE user login without Radius .

If you dont have any radius server in your network and you want to create the users in Mikrotik NAS in that case , The mikrotik will  verify the users name and password  and after that they will be able to login So first of all you have to create  the users in Mikrotik router and like wise you can assign the bandwidth  for the users individually  .


Before you create the user in mikrotik router you have to have a IP pool in yopur mikrotik . Because the users will get the IP address from that Pool only .

Go To IP>Pool >Add IP pool (+)


/ip pool
add name=Default ranges=192.168.0.2-192.168.0.254


Go To PPP>Secret> And Add(+)


/ppp secret

add name=laxmi password=12345


After configure the user you will be able to login .


If you want to assign the same bandwidth limit for all the users then you have to assign that bandwidth in PPPoE profiles , In my case its default profile .


/ppp profile
set *0 dns-server=8.8.8.8,4.2.2.2 local-address=192.168.0.1 rate-limit=\

    512000/51200 remote-address=Default


If you want to give separate bandwidth for each users then you have to follow the below process .
In this scenario don't assign any bandwidth limit in Profile .


Go to PPP>Secret>


/ppp secret


add limit-bytes-in=1024000 limit-bytes-out=1024000 name=laxmi password=12345


MIKROTIK:-Multiple PPPoE Server Profile setup for Each PPPoE server .

It's not mandatory to configure the different different PPPoE profile for each PPPoE server . But sometimes it required because lets you want to configure the different different IP pool for each PPPoE server and if your IP pooling is enabled from NAS , In that case it's mandatory to configure the different different Profile .

In my previous LAB i had created 3 PPPoE server for 3 VLAN and here I  have assigned them in one profile which is named as Default . But in this LAB i decided that to create 3 IP pool in my NAS and I will assign these pools in different different Profile to provided the different  IP POOL for each VLANs.

Lets start the configuration .


In my above picture I have 3 PPPoE server and I have assigned them into one profile (default).


Step-1

I am going to create the 3 ip pool and i will assign these 3 IP pools in 3 profiles  .


GO to IP>POOL>ADD(+)

Step-2


Assign these 3 IP pools in three profile .
Go to PPP>Profiles>


Step-3


Assign these profiles under the PPPoE server .

Go to PPP>PPPoE Servers


As you can see teh configuration is complete and the users will get the different different IP address from different Pool based on their PPPoE Profile .


Please find the details below configuration .


To create the VLAN 


/interface vlan
add interface=ether6 name=vlan2 vlan-id=2
add interface=ether6 name=vlan3 vlan-id=3
add interface=ether6 name=vlan4 vlan-id=4

To Create The IP POOL


/ip pool
add name=VLAN2 ranges=11.0.0.2-11.0.0.254
add name=VLAN3 ranges=12.0.0.2-12.0.0.254
add name=VLAN4 ranges=13.0.0.2-13.0.0.254

 To Create the PPPoE server 


/interface pppoe-server server
add authentication=pap default-profile=VLAN2 disabled=no interface=vlan2 \
    one-session-per-host=yes service-name=service2
add authentication=pap default-profile=VLAN3 disabled=no interface=vlan3 \
    one-session-per-host=yes service-name=service3
add authentication=pap default-profile=VLAN4 disabled=no interface=vlan4 \
    one-session-per-host=yes service-name=service4

To create The Different different profile for different PPPoE server


/ppp profile
add dns-server=8.8.8.8,4.2.2.2 local-address=10.0.0.1 name=VLAN2 \
    remote-address=VLAN2
add dns-server=8.8.8.8,4.2.2.2 local-address=10.0.0.1 name=VLAN3 \
    remote-address=VLAN3
add dns-server=8.8.8.8,4.2.2.2 local-address=10.0.0.1 name=VLAN4 \
    remote-address=VLAN4


MIKROTIK:-PPPoE configuration On VLAN Interface .

This is one of the most popular method to provide the vlan base PPPoE connection in the ISP domain . But there is some additional configuration required for this activity .We can configure the multiple PPPoE server in one physical interface using multiple VLAN and as you can see my picture
below there is configured the LINK from mikrotik NAS to switch is trunk link and also I have allowed all the VLAN in that port .


Lets start the configuration .


Lets Start the configuration according to my scenario .


Configure the VLAN first in  Mikrotik .


Here , I have created  only 3 vlan for testing purpose but you can create up to 4096 VLAn in the Mikrotik .

Step-1

Click on Interface >VLAN>Add vlan(+)


/interface vlan
add interface=ether6 name=vlan2 vlan-id=2
add interface=ether6 name=vlan3 vlan-id=3

add interface=ether6 name=vlan4 vlan-id=4

Step-2

Create The PPPoE server in each VLAN .

Go to the PPP>PPPoE Servers>Add Server (+)


/interface pppoe-server server
add authentication=pap disabled=no interface=vlan2 one-session-per-host=yes \
    service-name=service2
add authentication=pap disabled=no interface=vlan3 one-session-per-host=yes \
    service-name=service3
add authentication=pap disabled=no interface=vlan4 one-session-per-host=yes \

    service-name=service4


I Have created 3 PPPoe servers for VLAN-2,3,4 . and in same way you you can create multiple PPPoE server under one physical interface using VLANs .


Apart from that , No need to change anything in the configuration end . everything would be same as my previous PPPoE server configuration .


After completion of these things in the Mikrotik then  you have to create the VLAN(2-4) in cisco switch and the port should be configure the trunk between the switches .And you need to make the access port for providing the access to users .


Note: Security issue: do not assign an IP address to the interface you will be receiving the PPPoE requests on.


You don't need to change anything at any where except these changes what I Did on my above picture .


MIKROTIK:-PPPoE configuration On Bridge Interface .

There is an another features of mikrotik to run the PPPoE on bridge interface . As I discussed on my previous chapters  Bridge is just a combination of multiple port and this interface will be act a single port internally .


if you want to run multiple PPPoE server instance on different different interfaces that would be a like overhead on the router so if you want to use multiple LAN port on specific services then that would be better to configure the bridge interface using multiple ports and then after you can run the PPPoE on that bridge interface

Network Diagram Given Below .


Here , I am not going on the step by step to configure because the configuration is same as normal configuration but only you have to create the bridge interface before you run PPPoE on bridge Interface .


Create one Bridge and assign the ETh-1,2,3 inside that bridge .


In my above Picture I have removed the physical interface from interface list and I have assigned the bridge interface which is named as laxmi.


NOTE:- Some key points .


MTU value Should be same in all interfaces .
Speed and Duplex Should be same in all interfaces .

Note: Security issue: do not assign an IP address to the interface you will be receiving the PPPoE requests on.


You don't need to change anything at any where except these changes what I Did on my above picture .


MIKROTIK:-Mikrotik Licenses

You have to purchase the licenses based on your requirement because all the features are not available in the all licenses so you have to decide the licenses based your requirement and also it depends on the Hardware of your Mikrotik router because every router board does not support
all licenses level.


There are many licenses level in the Mirkotik . Please find the details below image and also you can visit the Mikrotik official website to know more about the Mikrotik licenses .


you can see the details about Mikrotik licenses in the above picture . you can see that there is only 1 user will be live in the hotspot in license level 3. and in the licenses 6 it's unlimited . So based on your requirement you can select the licenses .

By default in CCR routers , license level 6 is pre-built  . If you have any old router-box which is less than licenses level 6 you can purchase that license from Mikrotik and you can upgrade the license . 

Thursday, 1 June 2017

MIKROTIK:-NAT configuration (Snat and PAT)

NAT is most important thing to provide the internet to users if you are using the private IP in your network . Here i am using the Private IP address in my network So i have to use the NAT to translate the private IP in to Public IP .

There are many ways to configure the NAT in the Mikrotik .

Here I have a /24 private Ip pool and i am configuring them into one public IP address which is my WAN and that one public IP is provided by my ISP .But in the Mikrotik that concept is called as Masquerade .


 Go to IP>Firewall >NAT then ADD(+)


Enter The LAN IP pool in the source address list .


Then Go To Action and select the Masquerade .

The Masquerade means all your source ip pool will be translated into your single WAN public IP  address when they will go out of the network .


CMD:-

/ip firewall nat add chain=srcnat action=masquerade 

SNAT Configuration :- 

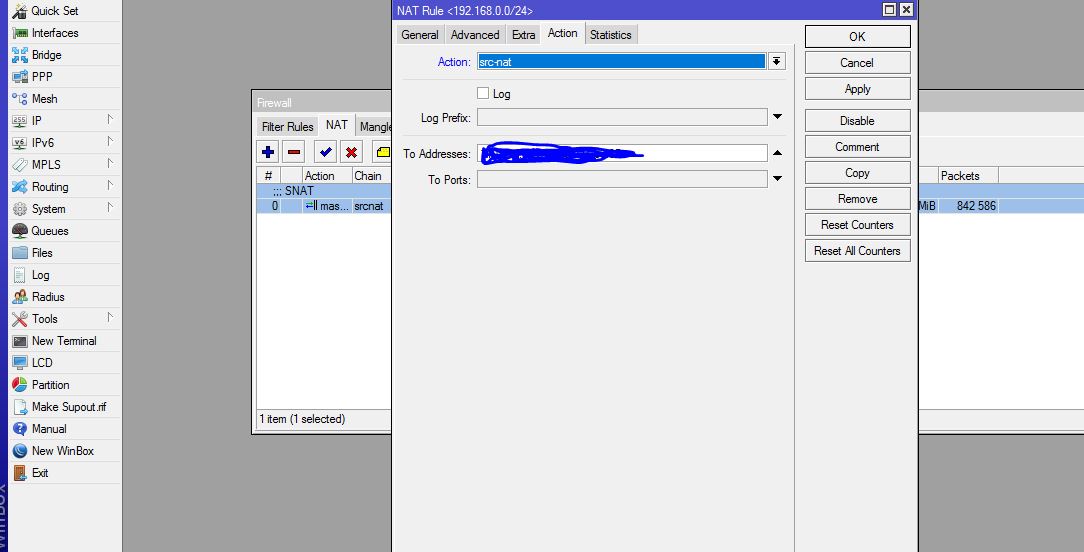
In this scenario I have a same /24 LAN private IP pool but i dont want to configure the NAT in to WAN ip address , I have some public IP range which is provided by my ISP so i am going to use that IP pool as Natting ip for this Lan IP Pool . and all the LAN users will be translated in to that public ip Pool.. There is a little modification required in the NAT configuration and Only I will have to enter the SNAT ip pool range  instead of masqueraded


Here , In the To Address list I have enter the ranges of Public IP which pool i am going to use
as SNAT ip Pool.


Address List . The address list is same as the NAME ACL in Cisco .You can configure the multiple IP ranges in the same name and you can call that name in the Advance of source address list in case of NAT . This is quite intelligence technology to add the IP's in Address list and that would be easier to configure the same rule for multiple IP pools.

Here , I am just giving you one example and later on I will show you more example when i will configure some advance firewall settings in Mikrotik .

Natting using Address List of the Firewall .

Here , you can see i have entered 2 networks in the address List so it would be easier for me to configure the NAT in single Line because I have the same name for both the Network.Here I am not entering Ip address in source address list of General tab instead i have called that name in advance tab of source ip list .


Completed the task Now .

MIKROTIK:-PPPoE Server Configuration with DMA Radius .

As an engineer in ISP domain you have to know some of the important key points before
implement the PPPoE network in your organisation .As per as My recommendation this blog will
help you to know more about  PPPoE services .Now a days there are all the radius company which is compatible to run the PPPoE services with Mikrotik .

I have given you the picture below of my network to run the PPPoE services .Here I am using this diagram .

Lets Start the configuration .


NOTE:---Whichever  the IP address  you are providing to the users after verifying the username and password please Don't configure any IP address in PPPoE interface from that subnet  . So it's not recommended to configure the ip address in PPPoE interface .Because the ip will be thrown by Mikrotik NAS from the IP pool which you have assigned in the remote ip pool list of PPPoE profiles.


Here , I have a default IP pool in Mikrotik pool list  and the users will get the ip address from that IP pool  , But i have not configured any IP in my PPPoE interface from That sub net (192.168.0.0/24).


Step -1

Click On PPP >


Click On PPPoE Servers and CLick on Add(+) .

Service Name:Which ever the service name you can give according to you but sometimes you can create a problem like that when the users are setting their dial up connection they have to enter this exact service name in their device .
Interface :-  which interface you want to run the PPPoE services you have select that  same interface in the interface list .And all your PPPoE users will be connected from that interface only .

MAX MTU-Maximum Transmission Unit. The optimal value is the MTU of the interface the tunnel is working over reduced by 20 (so, for 1500-byte Ethernet link, set the MTU to 1480 to avoid fragmentation of packets.The recommenced MTU 1492 because there is adding some extra 8 bit ine header . so it's important to keep in your mind .


One session Per host:-Allow only one session per host (determined by MAC address). If a host tries to establish a new session, the old one will be closed.

PPPoE Profile 

This is very important to configure the PPPoE profile for PPPoE users because based on your profile
the services will be available to the users .

In my case I have selected the Profile1 as profile of my PPPoE server .


  Lets get in to the Profile 1.


Local Address :- The Local Address means , this local address will be the gateway of your PPPoE users and for recommendation it would be your WAN IP but also you can give your LAN ip .

Remote IP address:-  The remote IP address means the users will get the IP address when they will dial using their username and password .

     NOTE:- The ip pooling is depend on your requirement because if you are using the radius server then you can enable the IP pooling in NAS and RAdius as welll but you cant enable the IP pooling in both nas and radius so you have to enable the IP pooling from one it can be your NAS or it can be your radius . But here I have enabled the IP pooling in NAS so I have disabled the IP pooling in Radius .

If you want enable the ip pooling in NAs then you have to create one IP pool in NAS and Radius as well but the IP will be provided to the users by NAS .And you have to assign that Pool name in remote ip address .In my case I have  configured the IP pool in nas the name of default and that IP pool i have configured in the Remote IP Address .


After creation the IP pool in NAS ,you have to assign that ip pool in Remote IP address list .and after that when the users will be dial using their username and password they will get the IP from this Pool of NAS .


You have to enter the DNS ip in the profile because it's very important to get the DNS for users otherwise they will not able to browse the internet .


Here, I am using the radius server with Mikrotik NAS so I have to select the Use Radius .


Here is some important things to have in the PPPoE profiles .


Session Time out-  Maximum time the connection can stay up. By default no time limit is set.If you will setup any time the NAS will make log out to that user from NAS .

Idle Timeout:-Specifies the amount of time after which the link will be terminated if there are no activity present. Timeout is not set by default.


Radius Configuration in the Mikrotik .


Address:My Radius IP
Secreat:-Shared secret used to access the RADIUS server.
Authentication Port -RADIUS server port used for authentication
Accounting Port:-RADIUS server port used for accounting.

Note:-Don't Select the Accounting Backup always if it's not  for backup RADIUS server.


You have to select the Radius Incoming because that allow to terminate a session which has already been connected from RADIUS server. For this purpose DM (Disconnect-Messages) are used. Disconnect messages cause a user session to be terminated immediately.


Now you have to add the NAS in your RADIUS but here i am not going to show you that .
and later on i will upload that screen shot of the NAS adding in the Radius  .