Showing posts with label Mikrotik. Show all posts

Monday, 5 August 2024

Mikrotik Multiple port trunk with bridge .

 Find the diagram given below.

########################################################

/interface bridge
add name=bridge1 protocol-mode=none vlan-filtering=yes

########################################################

/interface vlan
add interface=bridge1 name=10 vlan-id=10
add interface=bridge1 name=192 vlan-id=192

########################################################

/interface bridge port
add bridge=bridge1 interface=ether3
add bridge=bridge1 interface=ether6

########################################################

/interface bridge vlan
add bridge=bridge1 tagged=bridge1,ether3,ether6 vlan-ids=192,10
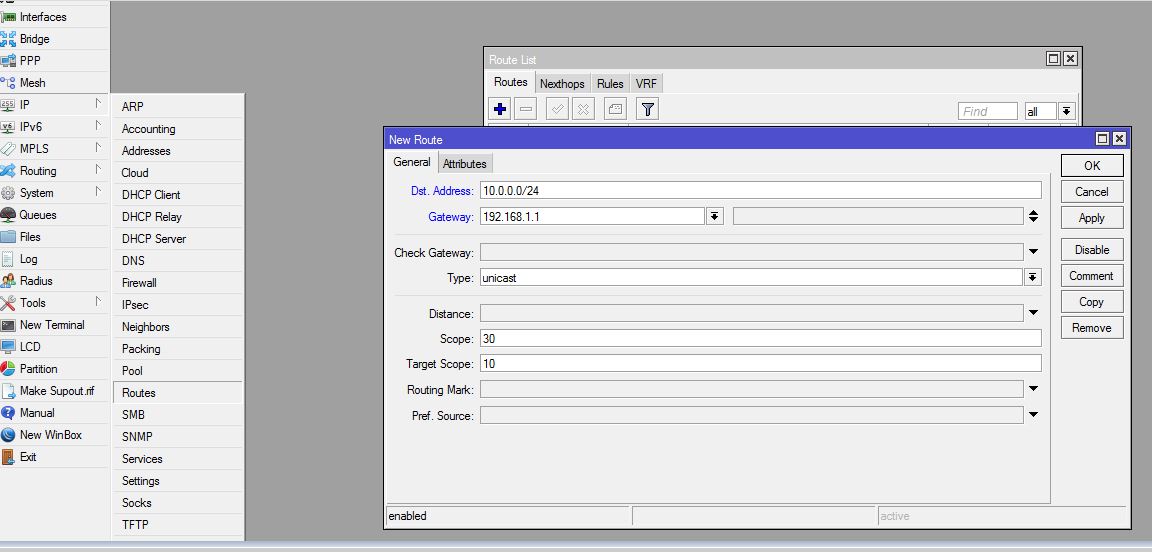
########################################################

/ip address
add address=11.1.1.1/24 interface=192 network=11.1.1.0
add address=10.1.1.1/24 interface=10 network=10.1.1.0

########################################################


Wednesday, 10 July 2024

2 ISP Auto Failover--(2 Broadband internet failover Configuration)

 Here i will show you the simple configuration of Aoto switchover between two isp .


Note to remember.


In this configuration, At a time one link will be worked .So if the primary link will be completely down the link will be switched over to secondary.


In this configuration simultaneously you can't send the traffic on 2 isp.


Step-1:Create the interface group.

/interface list
add name=WAN
add name=LAN
/interface list member
add interface=eth1 list=WAN
add interface=eth2 list=WAN
add interface=eth3 list=LAN


Step-2-Configure The IP address.

/ip address
add address=172.20.20.1/30 comment=VODA interface=eth1 network=172.20.20.0
add address=172.20.20.5/30 comment=AIRTEL interface=eth2 network=172.20.20.4
add address=172.21.21.1/24 comment=MY_LAN interface=eth3 network=172.21.21.0

Step-3-Configure the IP route.


/ip route
add check-gateway=ping distance=1 gateway=172.20.20.2 
add check-gateway=ping distance=2 gateway=172.20.20.6


Step-4-Configure the NAT for both the interface.

/ip firewall nat
add action=masquerade chain=srcnat out-interface=WAN


Saturday, 9 December 2017

Mikrotik:Bandwidth scheduling

The Limit of Different Bandwidth In Day and Night will be manged by Mikrotik according to your
requirement .As you have seen there are most of the person are configuring their bandwidth
scheduling on various types .

There are lot many ways to limit bandwidth for day and Night, but personally I found this is the easiest way, Here it is.

I have used Simple Queue, Script and Scheduler.

Suppose we have one network 192.168.20.0/24 and want to limit Bandwidth for day and Night Time.

My LAN Network 192.168.20.0/24

Bandwidth = 06:00am – 18:00pm – 1Mbps. <Max-Limit>
Bandwidth = 18:00pm – 06:00am – 2Mbps. <Max-Limit>

Create two simple queues for the same network with different Bandwidth Limit.

/queue simple
#name=”Day” target-addresses=192.168.20.0/24 dst-address=0.0.0.0/0
interface=<ether-x> parent=none direction=both priority=8
queue=default-small/default-small limit-at=512k/512k
max-limit=1M/1M total-queue=default-small

#name=”Night” target-addresses=192.168.20.0/24 dst-address=0.0.0.0/0
interface=<ether-x> parent=none direction=both priority=8
queue=default-small/default-small limit-at=1M/1M
max-limit=2M/2M total-queue=default-small
Now, write scripts

/system script
#name=”Day” source=/queue simple enable Day; /queue simple disable Night
#name=”Night” source=/queue simple enable Night; /queue simple disable Day
Finally, Schedule it

/system scheduler
#name=”Day” on-event=Day start-date=oct/13/2007 start-time=06:00:00 interval=1d
#name=”Night” on-event=Night start-date=oct/13/2007 start-time=18:00:00 interval=1d


The configuration is simple and based on your requirement you can make change the rule little bit .But here I am not making it different any way and the way of configuration will be same as above .

Monday, 4 December 2017

Mikrotik:-EoIP in Mikrotik

Eoip is a layer 2 mechanism which is called as Ethernet over IP.

At this time I will share again about the material mikrotik, and still the same as before, this time we will still discuss about tunneling. The tunneling we will be using at this time, is the EoIP tunnel. EoIP itself, is a tunneling that works on layer2 that connects a network with other networks

For your own security, EoIP has very low security, because EoIP does not encrypt the packets sent via EoIP. But for its benefit, EoIP can connect the same network even in different areas.


Configuration

For configuration, of course, first configure ip address for the interface that will be used. For the ip address itself, make the local network R1 and R2 are in the same network because we will create an EoIP tunnel that works based on Layer 2. Next, configure EoIP on the router.


[admin @ R1]> / eoip interface
add local-address = 12.12.12.1 name = eoip1 remote-address = 12.12.12.2 tunnel-id = 10
[admin @ R2]> / interface eoip
add local-address = 12.12.12.2 name = eoip1 remote-address = 12.12.12.1 tunnel-id = 10

Based on the above configuration, we only need to define the local address and remote address of the router that wants to make tunneling. Then for the tunnel id, it will provide an identity for the tunneling made that the tunneling used is only for those using tunnel id 10. Next, configure the bridge.

[admin @ R1]> / interface bridge
add name = eoip
[admin @ R1]> / interface bridge port
add bridge = eoip interface = ether1
add bridge = eoip interface = eoip1

[admin @ R2]> / interface bridge
add name = eoip
[admin @ R2]> / interface bridge port
add bridge = eoip interface = ether1
add bridge = eoip interface = eoip1

Based on the above configuration, we create the eoip interface that has been dbuat earlier, "ter-bridge" with the interface to the local network that we have. This is because EoIP works on layer 2. So that the client router can connect with other routers, we only need to do the bridge configuration with the existing eoip interface on the router. If so, verify.

Tuesday, 29 August 2017

MIKROITK: How To stop SSH Brute force

Sometimes you may see there are many SSH connection has been established in your router and due to this problem The routers CPU process will be high and the bandwidth utilisation will be high . So in that case you  can consider it as SSH Brute force attack in your network .


/ ip firewall filter
add chain=input protocol=tcp dst-port=22 src-address-list=ssh_blacklist action=drop comment="Drop SSH Brute Forcers" disabled=no
add chain=input protocol=tcp dst-port=22 connection-state=new src-address-list=ssh_stage3 action=add-src-to-address-list address-list=ssh_blacklist address-list-timeout=1d comment="" disabled=no
add chain=input protocol=tcp dst-port=22 connection-state=new src-address-list=ssh_stage2 action=add-src-to-address-list address-list=ssh_stage3 address-list-timeout=1m comment="" disabled=no
add chain=input protocol=tcp dst-port=22 connection-state=new src-address-list=ssh_stage1 action=add-src-to-address-list address-list=ssh_stage2 address-list-timeout=1m comment="" disabled=no
add chain=input protocol=tcp dst-port=22 connection-state=new action=add-src-to-address-list address-list=ssh_stage1 address-list-timeout=1m comment="" disabled=no

Thursday, 1 June 2017

MIKROTIK:-How To add the DNS address

The DNS configuration is very simple here find the details below screen shot to make it simple .

/ip dns set cache-size=10000KiB servers=8.8.4.4,8.8.8.8


NOTE:-Don't select the Allow Remote Request . Sometimes the router is receiving huge unwanted  DNS attack so please don't click on checkbox of Allow Remote Request in production network .


MIKROTIK:-How To configure Default route and Static route

Please find the details below of my mikrotik snapshot to configure the static route and default route
in GUI and CMD as well .


As we know the default route is for forwarding all the traffic towards internet so the router will
forward all the traffic to your gateway and Basically it's required to configure when we are connecting to ISP .


Default route example.


/ip route add dst-address=0.0.0.0/0 gateway=192.168.1.1 distance=1


The static route is required when we want to provide the reach-ability to any particular network .


Static route Example.

/ip route add dst-address=10.0.0.0/24 gateway=192.168.1.1 distance=1


Wednesday, 31 May 2017

MIKROTIK:-How to configure the IP address


The below information will help you to configure the IP address in the mikrotik interfaces .


[admin@MikroTik] ip address> add address=192.16.1.1/24 interface=ether6
[admin@MikroTik] ip address> print
Flags: X - disabled, I - invalid, D - dynamic
  #   ADDRESS            NETWORK         BROADCAST       INTERFACE
  0   10.5.7.244/24      10.5.7.0        10.5.7.255      ether1
  1   192.16.1.1/24      192.16.1.0      192.16.1.255    ether6

[admin@MikroTik] ip address>


Please find the details below of my images so it would be easier for you to configure the ip address
in GUI and CMD as well.